
Blueprint reader and takeoff tool for Construction Plans Online.
Blueprint reader and takeoff tool for Construction Plans Online.
Printing
The first Button on the toolbar is the print button:
![]()
When you press this button, the print dialog will appear:
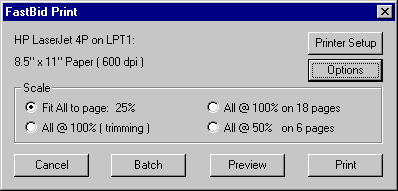
The first choice under scale, "Fit View to page" will print the current view as large as it will fit on one page. This will be worded "Fit All to page" when the current view is the whole page ( it's zoomed out ). This is a quick way to print a small copy of a drawing for reference or to print a detail ( when you're zoomed in on part of the page ). If you need a scalable print of a detail or drawing, press the "Preview" button to select the scale and to see how many pages it will take ( described below ).
Selecting "All @ 100%" will print the entire drawing at full scale on one piece of paper. This is the option to use when you have a large format printer. If the selected page size isn't large enough, then it will trim equally from the top and bottom and the left and right of the drawing to center the print on the page. If the selected page size is larger than the drawing, then some of the page will be unused. As a quick guide to tell if the selected paper size is correct, just look at ( but don't select ) the fit percentage ( 'Fit View to page: "24%"' ). If it is close to 100% ( 95% to 110% typically ), then "All @ 100%" will produce a full scale copy of the original drawing without clipping. If the fit percentage gets too far below 100% ( less than 95% ), then the chance of the border being clipped increases. In this case, it's best to go into Printer Setup and look for a larger page size. If the fit percentage is very high ( 125% or more ), then the drawing would most likely fit on a smaller page size.
The other two options, "All @ 100% on X pages" and "All @ 50% on X pages" are the ones to use when you need a scalable print and you don't have a large format printer available ( or you have one that doesn't go large enough ). Either choice will tile the print on multiple sheets of paper ( whenever "X pages" is more than 1 ) to give you a scalable print ( some assembly required ). In the event of an emergency, "All @ 100% on 25 pages" can be used to print a full size drawing on letter size paper to be faxed to a remote location where they have lots of scotch tape.
The "Printer Setup" button opens the standard Windows setup controls for selecting the printer, paper size and other print settings. These settings along with the basic Scale option on the FastBid Print dialog will be saved when you press the Print button. If you want just the current page printed with one of these basic scale options, then press the "Print" button to start the process.
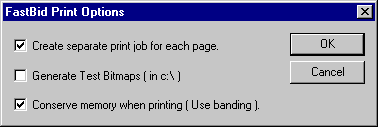
The Options button opens the FastBid Print Options dialog to allow you to control a few items. The "Create separate print job for each page." option affects how batch printing is spooled. "Generate test bitmaps" is used to track down printing problems. "Conserve memory when printing" controls whether the image is sent to the printer driver all at once or in narrow strips. The printed page appears the same but this can be used to work around problems in some printer drivers.
Batch Print
The "Batch" button on the FastBid Print dialog allows you to select more than one page to print at a time:
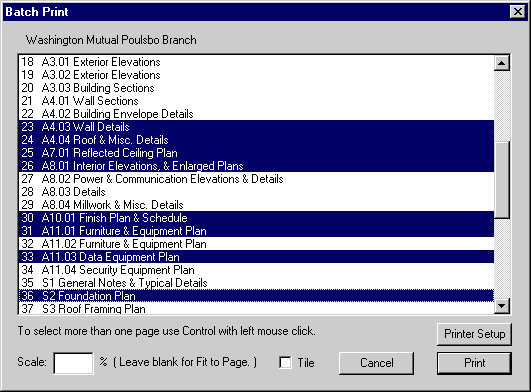
The "Scale" and "Tile" options at the bottom of the page allow you to control how the drawings will print. By default, they will be set to reflect the basic "Scale" option selected on the first print dialog. If you want to change them, then see the description below for the "Scale" and "Tile" options on "Print Preview.", these work the same way. When the "Batch Print" dialog opens, the currently loaded drawing will be scrolled into view and selected. To starting the batch print, press the print button. Whichever drawings are selected will then be sequentially downloaded and printed.
There are several ways to select multiple drawings from the list. You can select a range by clicking the left mouse and dragging downward. You can also click and release on the first drawing, scroll down until you see the last drawing in the range to be printed and then with the shift key down, click on the last drawing. After you select one or more in a range, other drawings can be selected by holding down the "control" key ( Ctrl ) and clicking on them. You can also unselect a drawing with control-click. Once they're properly selected, press the "Print" button to start the process.
Print Preview
The "Preview" button on the first print dialog gives you full control of the print and shows what to expect:
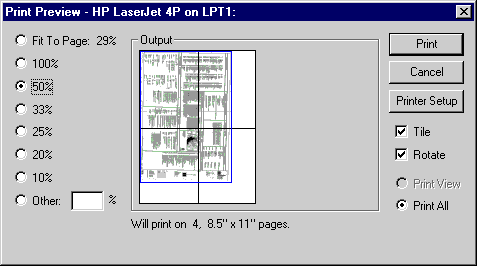
Again, the initial settings here will reflect the basic scale option selected on the first print dialog. To get familiar with the basic scale options and what they do, select each option and look at the preview. The "Print View" radio button will be enabled if you were zoomed in on the drawing before you started printing. If not, then the current view is the whole drawing, so "Print All" will be selected. If you were zoomed in on a detail or schedule and that view is what is needed, then leave the selection on "Print View." If you were zoomed in but want the whole drawing, then select "Print All"
Selecting "Fit to Page" will print the drawing as large as it will fit on one page. Selecting a percentage will give you a print at a known scale. If the "Tile" check box is selected, more than one piece of paper will be used if needed to print the drawing at the selected scale. If the "Tile" check box is not selected, then the output may be trimmed, because it will only use one page regardless of the selected scale and paper size. The "Rotate" check box can be used if you want to override the automatic rotation. By default, it selects the rotation automatically to print the drawing at the largest scale when fitting to a page and to use the least number of pages when printing the the drawing tiled.
The "Output" display in the center, indicates in the white area, what to expect on the printed pages. The blue rectangle represents the edges of the drawing image. If you are zoomed in and "Print View" is selected, then it will show a green rectangle indicating the bounds of the current view. When you are printing tiles, there will be black lines representing the edges of ajoining pages will be printed. Again, press the "Print" button to proceed.
Other
One note of caution about faxing tiled prints. When a drawing is faxed, many plain paper fax machines will scale down the fax image to fit on the piece of paper when receiving. This can cause a drawing which was printed at a certain scalable percentage to be inaccurate ( 4 to 7% smaller typically ).